
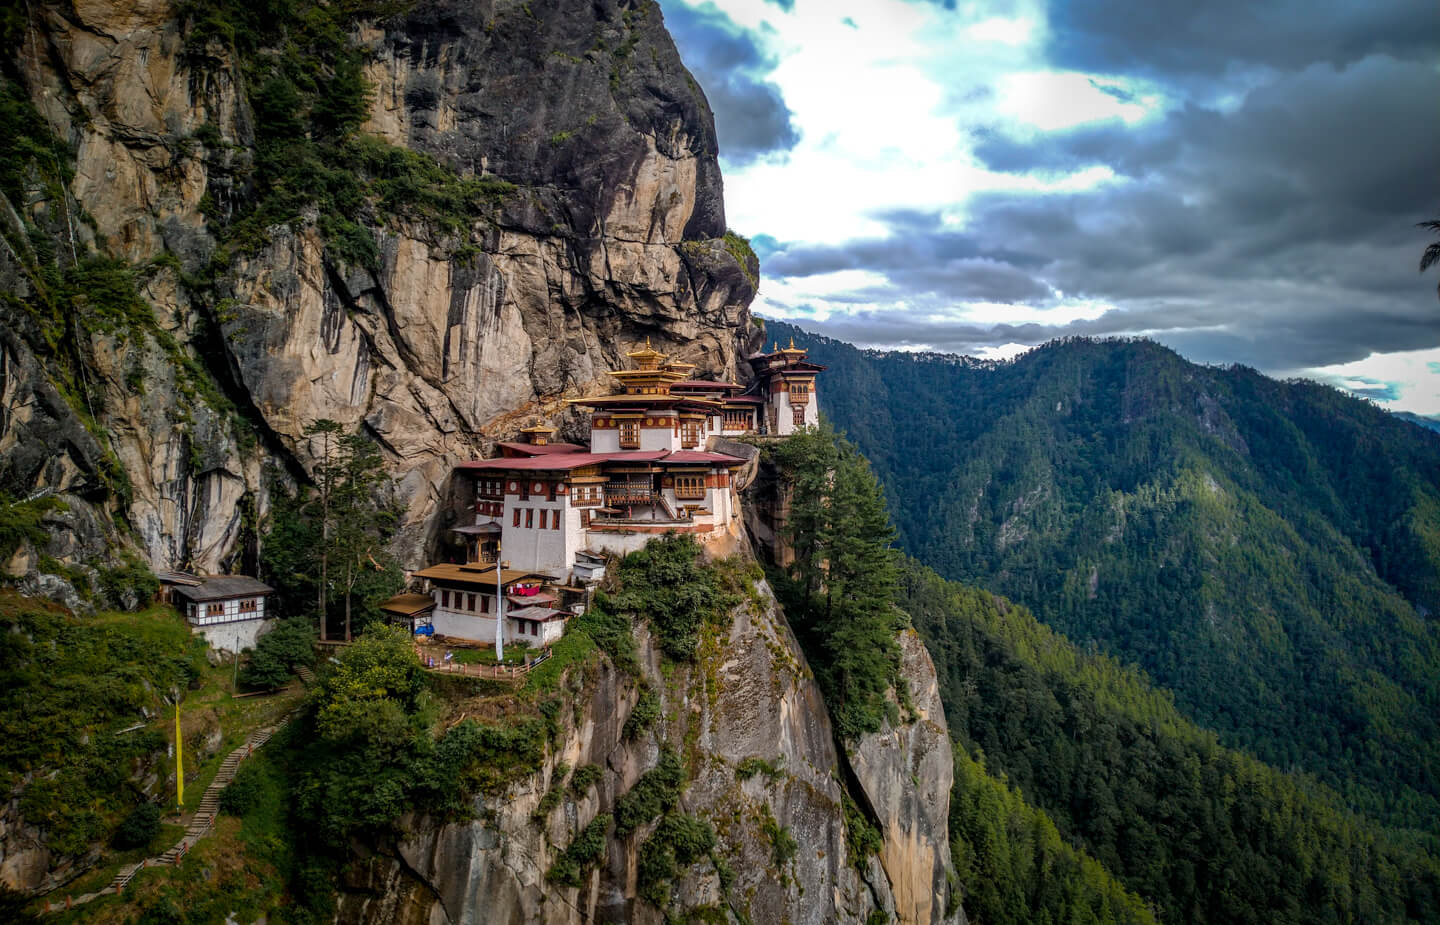
The Tiger’s Nest Monastery in Paro, Bhutan, is a fascinating place! A picture of the monastery is all it takes to have an intense desire to visit it. This desire is brought on by the picturesque façade of the monastery, set against a craggy cliffside—a seemingly impossible place to reach. It’s as if the scenery is a manifestation of an action or a superhero film (thinking of Batman’s trip to the Himalayas).
The Tiger’s Nest hike is bound to be the highlight of your Bhutan trip. The experience is aptly described by many as physically draining and spiritually overwhelming. Might I also add: supremely breathtaking?
Paro Taktsang History
Guru Rinpoche (or Padmasambhava), the man who brought Buddhism to Bhutan, is said to have arrived at this very spot from Tibet on the back of a flying tigress. He then meditated and tamed evil spirits inside a cave here, back in the 8th century. This cave is called Taktsang, which means Tiger’s Lair in the Tibetan language. Now you know how the place acquired the two names ‘Tiger’s Nest’ and ‘Paro Taktsang’.
The site became a meditation spot for many important Buddhist figures in the subsequent centuries. The monastery was built only in 1692 by the then ruler, who was believed to be an incarnation of Padma Sambha himself.
However, the buildings you see today are not the original, but the restored version after a fire broke out in 1998.
If you’re interested, read more Paro Taktsang history here.
How to Reach Paro Taktsang?
Owing to the location of this monastery high up on a cliffside, Paro Taktsang can only be reached by foot. It is a good 4 km uphill, which will take about 5-7 hours round trip. It will make you weary, so I suggest keeping a whole day for the Tiger’s Nest trek.
The base of the Tiger’s Nest hike is located 12 kilometres (7.5 mi) to the north of Paro town. From the town, it’ll take you about 20–30 minutes to reach here by cab. There is a parking lot at the base too!
Fortunately, Bhutan’s only international airport is located in Paro. So, it’s quite easy to get here. You can make Paro a base to travel to other Bhutan locations too, as the town is a charming one with plenty of good hotels (book here) and restaurants.
Read about other amazing to places to visit in Bhutan here.

The Tiger’s Nest Hike
Distance: 4 km
Elevation Gain: 900 metres
Height from Sea Level: 3120 metres
Difficulty: Moderate (gradual but continuous ascent)
Time: 5-7 hours total, depending on fitness
Buy Your Ticket (Only applicable to Indian, Maldives and Bangladesh nationals)
Remember: Bhutan’s currency is the Ngultrum, abbreviated to Nu. Indian rupees are accepted all over Bhutan as well as 1 INR= Nu.
At the base, get out of your car and purchase your ticket (cost: Nu./Rs. 500) before heading up. This ticket includes a guided tour of the monastery. You will not be allowed inside without it. However, note that you do not need this if you’re paying the government-chargeable package, which includes accommodation, transport and guide.
Tips:
- If you’re a student, show your ID card, and you will get the ticket for half the price at Nu./Rs. 250.
- Buy the ticket only if you’re going to go all the way to the monastery, as it isn’t needed if you’re going halfway (which a lot of people do). I would suggest going all the way up because it is spectacular.
- In case you can’t walk so much, hire a horse (Nu./Rs. 600–1000) to the halfway point (the most strenuous part of the Paro Taktsang hike) and walk the rest of the way. Easy!
- Most hotels provide sticks (makeshift hiking poles) for the hike. If yours doesn’t, then rent one at the base for Nu./Rs. 50. Sticks provide much-needed support during the slippery parts of a hike!
- Carry your passport. You will be asked to produce it to prove your nationality.
Hike To The Midway Point
Now that you’ve reached and have your ticket in hand, start the hike! You’ll pass souvenir vendors seated on the ground, who’ll do their best to convince you to purchase items from them on the premise of Boni (first sale of the day). However, it goes without saying: skip this after your trek!
As you clear the trees surrounding the base and parking lot, you’ll catch your first glimpse of the Tiger’s Nest Monastery Bhutan—a tiny speck high above on a cliff face. There is a little stream and waterfall here too!


You’ll walk on a wide dirt trail most of the way, which narrows at certain points. Don’t worry, it’s not dangerous or scary! It’s completely uphill but very doable.
I was attempting the Paro Taktsang trek on a recovering ankle injury and a food-poisoned tummy but nothing could stop me from making my way up! 🙂


You’ll find colourful prayer flags all along and benches in shaded areas for you to rest and recover. It’s quite serene and beautiful!

Don’t miss looking towards the splendid Paro Valley from time to time.

After about an hour or so, you’ll reach the halfway point. It is a flat, wide, and open area where you can relax for a bit, spin the prayer wheels, and admire the wonderful view of the monastery while you wait for your travel partners to catch up. You can also grab a bite at the Taktsang cafeteria, where you get a full meal buffet, tea, coffee, Maggi and the likes. However, I wouldn’t suggest doing so just yet. You have all the time on the way back!
Here, you can choose to go back or forward!

Hike from the Midway Point
As you get closer to the monastery after the halfway point, the trek gets exciting. Why? You’ll have your eye on the Tiger’s Nest most of the time. Sadly, that wasn’t the case for me because it started to snow unexpectedly. But it was an incredible experience nonetheless.

There is one particular point in this part where everyone gets THE picture clicked with the monastery epically clear in the background.
I have pictures here too but misty ones! However, catching glimpses of the monastery when the mist cleared momentarily was very rewarding.

You will then reach the easy part of the Paro Taktsang hike—a downhill walk on a stone staircase—before you eventually cross a bridge lined with prayer flags and make your way up. This climb will be a little demanding as there is just a stone staircase all the way to the monastery.
It typically takes 2–3 hours to reach the monastery gate. You’ll have to keep your bags, shoes, gadgets (including phones), sticks, caps, etc. in a locker room outside the monastery. Be warned that it is not entirely safe. A friend’s phone was stolen here! There is a guard positioned in the locker room, so the chances of such things happening are low. So just cross your fingers and go right ahead to the entrance of the monastery.
You’ll show your ticket and passport before being accompanied inside by a guide.

At the Monastery
The monastery has typical Buddhist architecture with white walls, built with stone and cement, and shining gold and red roofs. The buildings consist of four main temples, residential shelters, and eight caves, of which four are accessible.
You’ll be shown the temple interiors and the main cave where Padmasambhava meditated.
The temple is luxurious, with flickering candle lights, shiny domes, and idols. A large statue of a tiger, carved from a rock, is located in the hall of a thousand Buddhas. Quite mesmerising! At the cave, there are images of bodhisattvas and a holy scripture written with gold dust and the crushed bone powder of a divine Lama.
After your tour, you’ll head back the same way.

Now that you’ve seen all that you came to see, ensure you take plenty of pictures on the way down. It took us 2.5 hours to get to the top and 3 hours to go down because we were busy enjoying the view, observing nature, playing with cute mountain dogs, clicking pictures, and slipping on the dirt. Thank you for melting and making the ground slippery, snow!


The entire experience for me, was beyond what can be described in words. The snowy climb from the halfway point, the mist-shrouded mystical allure of the monastery, the colourful prayer flags dotting the way, and the immense greenery had me spellbound. The amazing people I met, spoke to and walked along with just added to the whole experience.

I don’t know what it is, but every time I visit a Buddhist temple, I start reflecting on life. I think about what I want, what makes me happy, and what I should do. This feeling was multiplied here by infinity. It’s probably all the calm and quiet that does it or the feeling of being in a spiritual location. I’m not sure.
But I can say this with a guarantee for anyone visiting: Your time here will be extraordinarily magical. Visiting the Taktsang Monastry and making it all the way to the top is an experience no one should miss.
When to Do the Tiger’s Nest Trek?
- Months: The best months to visit the monastery are from March to April (official start of summer) and from September to November (just before winter).
- Monastery timings: The timing is from 8 a.m. – 4 p.m. Earlier, the monastery would be closed from 1 PM to 2 PM, but this rule was changed in 2017.
- Time to start the trek: Start the Paro Taktsang trek early, between 7 AM and 9 AM. We left at around 9 a.m. and reached 11:30 a.m., leaving some time for any delays. Half an hour is ample time to explore the monastery. Ensure you’re back at the base before it gets dark.

Fitness Level Needed
- Anyone with average fitness can complete the Tiger’s Nest trek. I saw people in their 60s and 70s do the hike all the way to the top. So you can too! If you have specific ailments that hinder you from doing the entire trek, hire a mule or horse to the halfway point. Then you can decide if you would like to go all the way or return.
- Don’t rush the hike. It can be a feat for those who don’t have a good fitness level. So take your time, rest, and enjoy your way to the top. Do hydrate all along!
- Refrain from taking shortcuts. If you’re an adventurous soul, you may be inclined to take shortcuts along the way. Remember, these can be really slippery, so do them with hiking shoes. Also, you’ll have no company when attempting this. The whole fun of the hike was talking to strangers along the way.

What to Wear and Carry?
- Summer Wear: In the summer, wear full pants and a t-shirt with full sleeves. If wearing a half-sleeve t-shirt in the summer months, do carry a cover-up like a sweatshirt or jacket. Monasteries have a strict dress code.
- Winter Wear: In the winter and spring months, be prepared for anything. We hadn’t expected snow, so we weren’t properly dressed. I started to freeze at the monastery (it was so cold that I even cried). Wear full pants, obviously, and wear layers on your upper body—a t-shirt, fleece, and down jacket. Remember, you’ll be asked to take off your cap and shoes inside the monastery, so ensure your hiking socks are nice and warm. Also, ensure that the clothes you’re wearing are light and comfortable—no heavy jeans and the like weighing you down.
- Raincoat– The area receives frequent rain (and, ahem, snow!), so a good raincoat is a must.
- Sport/Hiking Shoes: We did the hike in sport’s shoes and were fine. But you might like to carry hiking shoes for a better grip.
- Hat, cap, and/or shades: to help cover your face and eyes from the harsh sun.
- Sunscreen: For the face and body!
- Water Bottle: A filled reusable water bottle to keep yourself hydrated throughout the trip.
- Snacks – energy bars, glucose tablets, chocolates, trail mixes, bananas and such to keep you snacking when hungry. You can also prepare sandwiches at the hotel and carry with you. We did this because we were students and didn’t want to spend money in the café.
- Backpack with Broad Straps: Carry all this in a backpack with broad straps. Ensure your backpack stays light.
- Hiking poles or walking sticks: do carry these for better grip and support. We got some at the hotel itself, but they are available for rent at the base as well.
- Passport: Mentioning this again, carry your passport to prove your nationality. We were asked to show it!
Other Tips
- Purchase souvenirs: If you want to purchase souvenirs, do so from the stalls at the base of the trek. They are cheaper than in Paro City.
- Eat a light breakfast. You don’t want to hike on a heavy stomach.
- Hike in a group. If you’re new to hiking, keep to your group. They’ll keep you motivated to go all the way up.
- Do not rest for long at the café while going up. If you do this, you might have the urge to not go at all. My suggestion would be to stop at the café only on the way down.
This blog post on ‘Tiger’s Nest Bhutan’ has affiliate links that enable us to earn a small commission when you make a purchase, with no extra cost to you. We only recommend products and activities we like and those that might interest you. If you like any suggested product, do buy from the given links.