
If you’re thinking about doing a round-the-world trip (RTW trip), then you may well know that it isn’t as easy as packing your bags and leaving for this big adventure. There is a lot to think about and plan, especially if you have a full-time job and a weak passport. But long-term world travel can be as rewarding as it is challenging to plan and execute.
Based on our experience planning our 6-month trip around the world, I’ve prepared a stepwise guide to help you start planning a world trip. So you know exactly what to do, from deciding the length of your trip to leaving for the adventure. I’ll be giving examples of our own trip along the way to help you understand why each step is essential.
So let’s get going and help you plan the trip of a lifetime!
- Step 1: Know your why before planning a world trip
- Step 2: Decide the length of the trip
- Step 3: Decide the date of travel
- Step 4: Shortlist continents and countries
- Step 5: Know the best time to travel (seasons)
- Step 6: Check visa requirements
- Step 7: Per day budget estimation
- Step 8: Make your final itinerary for a world trip
- Step 9: Final Budget
- Step 10: Do bookings
- Step 11: Apply for visas
- Step 12: Arrange important documents and cards
- Step 13: Pack for the RTW trip
- Step 14: Vacate the house
- Step 15: Leave for your around the world trip
Step 1: Know your why before planning a world trip
Do you want to travel slowly and feel like a local in places around the world, or experience backpacking, or do you want to learn the culture of different places, hike a million mountains, indulge in hobbies like photography, or just get away from your life back home? It could be anything.
Your why will be specific to you and help you plan the trip of your dreams.
Our why!
Our ‘why’ was that we wanted to travel to far-off places we’d only ever dreamed of. Places we probably won’t be able to get to on shorter trips. Feed our thirst for learning (I’m a history and geography buff) and our passion for photography (my husband is obsessed). My husband also loved the idea of taking a break from work (he’s been in the same job for 10 years and it was time to treat himself).
We wanted to do something people usually only think of and never put into action, especially in the country we’re from. Travel is seen as a luxury and not as a way to enrich yourself. It’s considered selfish and irresponsible.
But we want to live our lives on our own terms. Break away from the norm. Live a different life. An extraordinary life.
This was a step in that direction.
And that thought led to us planning a whole trip and making it a reality.
Step 2: Decide the length of the trip
Timeline: 1-2 years before the trip
After setting your mind on doing a world trip, the next question is, for how long should you go?
Your ideal length of trip will be dependent on:
1. Your savings and the budget you can allocate for your trip
2. Whether you’ll be quitting your job or taking a sabbatical
3. The number of places you want to see
You will need to find a balance between all of these for your ideal around-the-world trip duration.
1 year is usually the length of such RTW trips. It’s a fantastic amount of time to explore countries on 4-5 continents at a fast pace or 1-2 continents at a slow pace.
Why we chose to travel for 6 months
My husband knew he could not get a long 1-year sabbatical. It would be asking for too much.
3 months is the standard duration for a sabbatical in his company. However, 3 months seemed like a very short time in which we wouldn’t be able to cover more than 1 continent.
6 months was the sweet spot! We’d be able to hit at least two continents and see several countries, plus my husband would be able to ask for a sabbatical for this long. It would also mean we wouldn’t have to save money for a year’s worth of travel, making it easier for us to actually do the trip and yet have funds when we get back to our life back home.

Step 3: Decide the date of travel
Timeline: 1-2 years before the trip
Deciding the date of travel much in advance is extremely important to be able to make an itinerary because seasons do determine the travel route. You might not care about reaching places in the right season, but it is very helpful in avoiding the rains, hurricane season, peak winter, etc., to be able to make the most of time on a limited-duration trip.
I highly recommend choosing your date of departure to be at least a year or more later. There will be enough to plan, plus you’ll need to ensure you have adequate funds for the trip to occur. Unless you already have the funds.
How it went for us
We initially decided to start the trip on April 1, 2022 (or 2023) (we were waiting for the world to open up after COVID and didn’t know when our trip would actually happen). However, because of my husband’s changing work commitments, we eventually decided to instead start our trip in the month of July and end it in December. And we eventually travelled in 2023.
Remember, nothing is set in stone. Just a starting point for you to plan your trip. Who knows, you might not want to come back home after your decided trip duration.
This is the info you should have till now:
| No. of months | |
| Start Date | |
| End Date |
Note: If your travel date is not dependent on personal and work commitments, then you can also decide it after shortlisting countries and knowing the best time to travel. This’ll enable you to start travelling when the seasons are ideal.
Step 4: Shortlist continents and countries
Timeline: 1-2 years before the trip

It is impossible to see and do everything on one trip, be it for 6 months or 12 months. And so, you will have to shortlist which continents you want to focus on and which countries excite you most in these continents. This exercise will take a bit of time as you’re familiarising yourself with new destinations.
I highly recommend using an Excel spreadsheet to write down all the places you’re shortlisting – I’ve given an example of this below. Also, start marking these destinations on a map.
Continents
Start with determining the continents you would like to visit. You can do this based on the travel experiences you want to have. Shortlist regions you’ve never visited or want to spend a long time in, or places that aren’t easy to reach from your home country.
We knew we wanted to go to Europe for a few months because we’d never been before and Latin America was high on the bucket list because it was so far and we could never make it for short trips. These also have superb countries right by each other and are very much a part of backpacking routes, making travel by buses and trains easy.
While we didn’t want to travel around Asia (as we live there), it is often on people’s world trip route especially Southeast Asia. Southeast Asia is popular because it is extremely inexpensive and easy to travel around; again, the countries are stuck to each other. It is beautiful, there is a lot to see, and many people backpack these countries so travel is quite established.
Countries
You now have to decide which countries you wish to visit and a basic travel route. You will have to go through several long-term itineraries for your regions, continents and countries of choice. It’s best to Google the following:
Round the world trip itinerary for x months
x month itinerary for x continent/region
I did the same. I looked at a lot of itineraries online of people who’ve travelled through Europe and Latin America for extended periods of time and started noting down countries that looked exciting and could easily be combined together. I also noted countries that have been high on my bucket list.
Note that this is not your final list of countries but a tentative one. You should list down all the places you want to go to. You can pick and choose your final countries later!
What our plan looked like at this stage
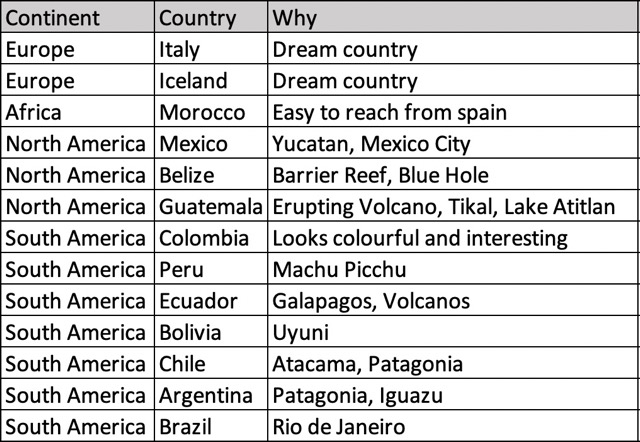
Tip: My biggest tip would be to look at a map and mark your favourite countries and cities on a map. Try memorising or getting a basic understanding of where these countries lie on the map. This really helps in making a final itinerary.
Step 5: Know the best time to travel (seasons)
Timeline: 1-2 years before the trip

After you’ve listed the countries, write down the seasons the country is best travelled in and when to avoid them at all costs. You should ideally avoid peak winter (unless that’s what you want to see), rainy season, hurricane season, and extremely hot weather.
This can also vary from destination to destination within a country. So you can also check this for bucket list destinations, e.g., Machu Picchu is rainy during Peru’s summer months, so it’s best to avoid it at that time. Patagonia in South America has very snowy weather from May to October, so hiking trails aren’t open during these months.
It is ideal to travel during shoulder season for the best combination of price, crowd and weather. However, when you’re planning your itinerary, you will ideally follow a logical route, crossing from one country to the next nearest country. So you will not be able to go everywhere at the right time. There will be some level of compromise.
What our plan looked like at this stage

Step 6: Check visa requirements
Timeline: 1-2 years before the trip
You will now need to know the visa requirements for each of these countries you’ve listed down.
Strong Passport: If you’re from a first-world country with a strong passport, you might not need visas for most countries. Still, it is better to check because during our travels, we did see people who’re not used to having to get visas get stuck in places where they actually did need them and assumed they didn’t.
Weak Passport: If you’re from a country with a weak passport, you will have to check visa requirements thoroughly. Just type ‘x country tourist visa for y country citizens’ to get Google Search results. This activity is the least fun because a lot of websites will be in other languages, not have the information readily available or may have confusing information. But it is necessary while planning a world trip, so you will have to do the work.
Depending on where you’re planning to go, a US tourist visa can be a lifesaver. Just by having a US tourist visa, you will not have to get a sticker visa for a lot of countries, and for others you might be eligible for an e-visa. While the US visa is the best one to have, visas from Canada, the UK, Schengen, Japan, and Australia can also be helpful. Just remember that the e-visa has to have a validity of at least 6 months on entering the country in question.
In case you’re planning to go to Latin America, you can always check my Latin America itinerary post, which has links to official websites where you can find the visa requirements.
Note: When selecting your final countries and making your itinerary, ensure you don’t need more than 2–3 sticker visas because you’ll go crazy applying for them and waste a lot of time at embassies and such. E-visas are much more manageable! But all in all, the fewer the visas needed, the better.
Our list of countries and visa requirements
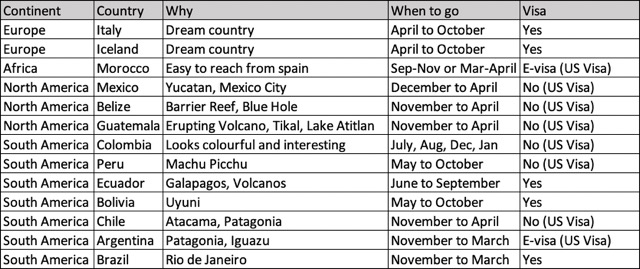
Step 7: Per day budget estimation
Timeline: 1-2 years before the trip
You will now need to note the per-day cost of travelling to these destinations. This is helpful in understanding which destinations are expensive and which are cheap. If you’re a budget backpacker, you can stick to the cheaper destinations, and if you’re a mid-range traveller, then choosing a combination of expensive and cheap countries is ideal.
You can get this per-day travel cost data from individual blogs based on your travel style (more accurate) or refer to a website like budgetyourtrip.com (less accurate but easier). These costs may not be totally accurate or may not exactly match your travel style but they will anyway give a good understanding of how expensive each country is.
What my plan looked like at this stage:
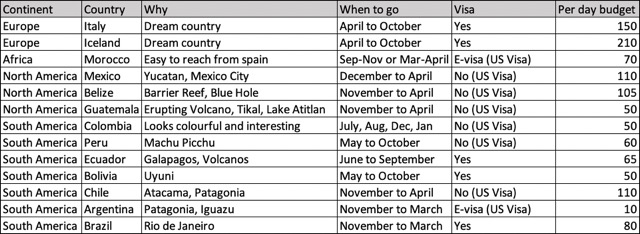
Note that not all these countries made it to my final itinerary. Depending on how much time I planned to spend in each country, new neighbouring countries I wanted to visit, and visa requirements, I had to remove some of the countries from the list. For example, we did not end up having Ecuador on our final itinerary because of lack of time and because we’d have to get an additional visa. Also, the Galapagos is quite expensive so we wanted to save that for some other day.
Step 8: Make your final itinerary for a world trip
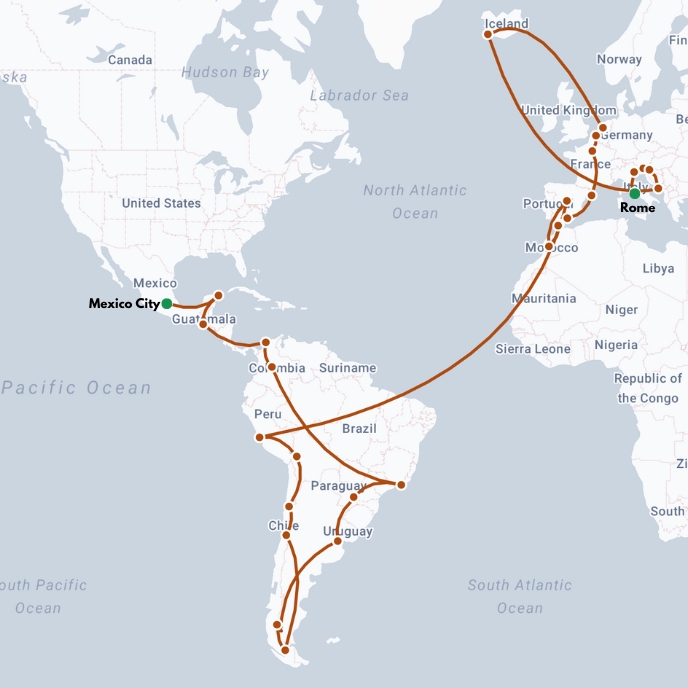
Now that you’ve collected all this data, you’ve got to finalise your route and itinerary. Depending on how adventurous you are, you can plan as follows:
The go-with-the-flow type
Timeline: At least 6 months before the trip
If you’re someone who doesn’t like having a plan or if you’re thinking of travelling slowly, then make a high-level plan to know which countries you would like to visit and for how many days. If there are any bucket-list cities and attractions you’d like to see, jot them down too. You can do so directly on Google Maps for future reference.
This high-level itinerary will help you ensure you have a basic understanding of the route you’d like to take based on the season and determine a high-level budget. You can change your plans whenever you like during the RTW trip.
Here’s a basic plan based on my example.
Oct 1-15: Peru
Oct 15-31: Bolivia
Oct 31- Nov 10: Chile
Nov 10-25: Argentina
…and so on
This high-level plan is best for people with a strong passport not requiring a lot of visas, budget travellers staying in hostels, people without FOMO and those who’re not anxious while travelling.
The planner
Timeline: At least 1 year before the trip (I actually made a high-level itinerary 2-3 years before the trip so that I could make a tentative budget early on and save up accordingly). But I made several changes to it when I made my final itinerary. I know that this step might be a bit much for most, so I’ve skipped it in this post.
Make a solid itinerary if you have a weak passport (in order to apply for visas) or if you’d like to maximise your time seeing many places.
You will need to have a day-wise itinerary in this case, noting down the country, city, mode of transport and major tourist attractions you’d like to visit. This’ll enable you to truly maximise your time in each city and country, enable you to make prior hotel and transport bookings, and save you a lot of stress during the RTW trip. It will also help to know your budget per country, as you can multiply the daily budget determined in the previous step with the number of days you’re spending in each country.
Here’s an example of our detailed itinerary:

….. and so on.
To get to this itinerary, I did the following Google searches:
- How many days to spend in X country?
- Which cities to see in X country?
- How many days to spend in X city?
- x city itinerary for y days
Mark all the cities you’re shortlisting on the map and plan a travel route to go from one city to another. Also determine, which mode of transport is best to get from one place to another. Rome2Rio is a great website for this.
For help planning your world trip, you can check out our 6-month world trip itinerary.
My thoughts: I made a very detailed itinerary for Europe before leaving for the trip because we were travelling during peak season and needed all the bookings done before we left. Also, for the Schengen visa, we needed to submit our detailed itinerary. While it was annoying to finalise everything before the trip, it helped save us a lot of headaches during the trip, as we didn’t have to plan each day’s activities while on the trip.
However, for South America, I only made a basic plan of how many days we’d spend in each city. This enabled us to book hotels and apply for visas. I didn’t plan or book any activities, nor did I do a lot of research. This meant that during the trip, we were often researching and planning after a tiring day. It was not fun. We also missed doing several activities because they were sold out, had to move around our hotel dates because flights were expensive on our chosen dates, and nearly missed visiting Machu Picchu. It was terrible!
Everyone has their own way of doing a trip, and not having things planned is just not our way. This is just something to consider while planning your own trip.
Step 9: Final Budget
Timeline: 6 months to at least a year prior (This depends on when you’re making your itinerary.)
To prepare your final budget, add the following:
Cost of international flights
+ Cost of visas
+ Total daily cost (no. of days in each country x daily budget of that country)
= approximate final budget
You can add 30% more to this sum for a safer final budget. Having this extra 30% of funds will help you during emergencies, enable you to spend on things you really want to do without worrying about the cost, or even stretch your trip for a few more days. If you don’t end up spending it, it’ll help you get back on your feet once you’re back from your trip.
Step 10: Do bookings
Timeline: 6-8 months before the start of the trip for planners and people with weak passports. If you don’t need a lot of visas or are planning to travel slowly, you can make a few bookings for the first 2 weeks to a month of your trip a month or so prior. Then book the rest as you travel.
Now it’s time to do bookings because the date of the trip is actually approaching.
Hotels: Start with booking hotels because these can be the toughest to choose and are nearly always needed for visa applications. We used Booking.com and Airbnb extensively to book accommodations and always booked cancellable ones. Since these were accommodations for a long trip, we knew we would be cooking often and hence decided to mostly book places with a kitchen, opting for studio apartments. If you’re a budget traveller, then also consider Hostelworld to book your hostels. Just ensure that the accommodation you book is in a safe, central location close to the sites you want to see.
Here’s a list of hotels we stayed at during our 6-month-around-the-world trip.
Note: I booked accommodations for my entire 6-month trip before we left, because I did not want to bother about it while on the trip. It turned out to be a fab decision. However, if that sounds exhausting, you can simply book accommodation for the first few months and book the rest along the way.
Flights: Look for flights on Skyscanner but try to always book on the official airline website, especially if you have multiple connecting flights. We did not do this and learnt the hard way that when things go south, the third-party website will not help and neither will the airline if the flight is not booked directly through them.
Also, for a trip like this, it would help to join one or all three of the airline alliances: Oneworld, SkyTeam and Star Alliance to accrue points/miles on every flight booking.
Transport: To book transport, you’ll probably have to refer to sites of that particular region or destination but here are some of my favourite transport booking sites that I used when planning the world trip.
Trains in Europe: Omio
Buses around the world: Busbud
Rental Cars all over the world: Discover Cars and Rental Cars
Ferries: 12Go, Ferryhopper
Activities: You do not need to book all the activities before you leave. Just the ones that will sell out for your first few months of travel. For example, we were travelling to Europe in the peak summer months so we booked all the major attractions and activities that could sell out before we left. We let the rest be and booked them a few days prior.
The go-to platforms for booking attraction tickets and activities are GetYourGuide, Viator and Tiqets
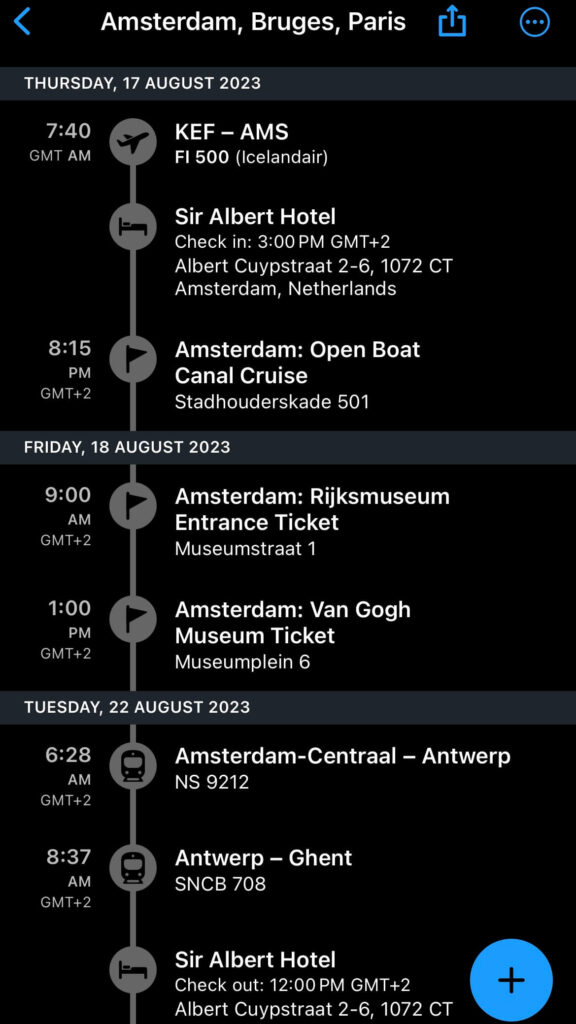
Travel Tip: Before you start your booking, download the app TripIt. TripIt fetches all your bookings automatically from the email and collates an easy-to-follow itinerary with all the booking details. Without this app, I do not think I’d have been able to manage the world trip.

Step 11: Apply for visas

After your bookings are done, you will have to apply for visas. Start this as early as possible because each time you’ll need to submit your passport at the embassy and wait to pick it back up. Only then can you apply for the next one so it can be a big pain.
Some countries may not allow you to apply for a visa more than 3 months prior; in that case, you may have to apply for it during your around-the-world trip. This is probably the most annoying part of planning a world trip, especially because everyone doesn’t have to do it to the same degree.
Here’s how it went for us:
We were to start our trip in July, starting from Europe.
Europe Visa: We were to start our Europe bookings in January, but due to a death in the family, I could only start in February. I was making our final itinerary, booking hotels, and transport simultaneously. After I was done, I tried applying for a visa appointment for March but could only get one in April. This delayed my visa process for other countries significantly.
So if you’re applying for a Schengen visa, book your appointment first and collate all your documents later. And yes, you will need hotel bookings for each day to apply for a Europe visa. It’s crazy!
Morocco e-visa: Before submitting our documents for Europe, I also quickly applied for a Morocco e-visa. This was important for us to show in the Schengen application along with our flight ticket exiting Europe so that they would be sure we weren’t staying back in Europe and would be given entry into the next country on our itinerary. I got the e-visa in less than a day’s time, which was a relief.
Brazil Visa: After getting the Schengen visa, we applied for the Brazil visa, which was a bit complex and required us to travel back and forth between two cities. But we got the visa easily and that too for 5 years!
Bolivia Visa: When we reached Peru, the first thing we did was apply for the Bolivia visa. It was super quick and only took us 2 hours to do the whole process and get the visa. We applied for it in Peru because the embassy said they wouldn’t process our visa 5 months in advance in India.
Argentina e-visa: We applied for this visa before leaving India, which was a mistake. It is best to apply for this less than 3 months before your trip to Argentina. However, I was exchanging emails with the e-visa authorities, and they were very kind to help us throughout the process but warned that if we apply for a visa so early, it could be rejected next time.
Step 12: Arrange important documents and cards
Timeline: 3 months before the trip
As the trip dates approached and we got our visas, we realised we had to get a lot of things sorted as well. Here are the major ones:
1. Vaccinations
For applying for visas for certain countries or visiting certain countries, you may need vaccinations like polio, yellow fever, Covid-19, etc.
For our set of countries, we needed a yellow fever vaccination. Getting one in India was a huge process since we could only get it from select government hospitals after filling an online form and getting an appointment (which can be tough to get depending on your city).
2. Travel Insurance
Anything can happen on a trip, especially one as long as this one, so it’s absolutely necessary to get travel insurance to cover your health-related issues and unexpected emergencies.
SafetyWing is an excellent option for travel medical insurance. Their Nomad Insurance provides coverage for unexpected illness or injury, including eligible expenses for hospital, doctor or medicine. They also provide emergency travel-related benefits, such as medical evacuation, travel delays, lost checked luggage, adventure activity cover, electronics theft and more.
Their two main benefits are that you can purchase the insurance even after your trip starts (which is not always the case with local travel insurances). The second one is that their claim process is quite simple and fast, which’ll help you save a lot of time on the road in case you need to file a claim.
Find out more about SafetyWing here or check the prices below.
Note for Indians
Before you leave India, you can get travel insurance from companies like Reliance, Tata, Bajaj Allianz, Care and others. They can be quite cheap! However, we had a very hard time with them because government policies for finance and insurance-related companies are not built keeping in mind long-term travel.
So note the following:
1. As an Indian, no company will issue you a travel insurance policy for over 180 days.
2. If you’re applying for a visa from X company for 2 months and then need to apply for another 3 months, then your only option is to extend the same policy you purchased for 2 months. You cannot get another policy from another company. And as it happened with our travel insurance from Niva Bupa, the original company may not pick up your calls or respond to emails.
3. We eventually took insurance from Acko because in their FAQs they mentioned that we can get a policy from them even after we’ve left for the trip. This isn’t the case with any other insurance company in India. However, when we actually had to claim the insurance, we struggled a lot. After 75 email exchanges and late-night calls, we were able to get our claim.
Takeaway: So while Indian insurance companies might be cheaper, they might also make you frustrated during your trip. And as such, I think digital nomad-specific insurance like SafetyWing is a better option even for us Indians on such a long trip.
3. International Driving Permit (IDP)
If you’re going to be driving in multiple countries, you may need an international driving permit. If you’re not sure whether you’ll be needing one, I suggest getting it anyway for this trip around the world.
An international driving permit is a translation of your driving licence in multiple languages and is used in conjunction with a driving licence. Examples of some countries that require you to have an IDP to drive are Italy, Austria, Thailand, Vietnam, and Bali.
For our 6-month trip around the world, my husband got his international driving permit online on this website. It took just 8 minutes to fill out forms and we had the digital copy of the IDP in a few hours. The physical copy was sent to us in about a week. We used it everywhere and had no issues. This is the most convenient way to get an IDP.
Note for Indians: While you can apply for an IDP at your local RTO, the process can be cumbersome: the address in your passport and your driving licence has to be the same, and it has to be your current address. In addition to visiting the RTO and waiting in a long queue, you may need to visit a medical professional at a specific government hospital to get a medical certificate (required in Pune) or even give a driving test (required in Kolkata). Specifications vary by RTO in India.
If you prefer getting an IDP from the RTO, then I highly recommend doing it through an agent. I did the whole process myself and really struggled.
Firstly, I had to get the address on my driving licence changed. Then I had to visit the RTO a couple of times because they messed up my IDP forms. I ended up getting the IDP after a month and didn’t get back my driving licence at all because the RTO ran out of cards to print the licence on. I ended up taking a driving licence printed on an A4 sheet with a sign and stamp from the RTO.
Obviously, I didn’t end up driving during the trip because imagine me showing an A4 sheet to the police abroad. Ridiculous.
4. Currency and Credit Cards
Carry at least 3-4 credit/debit cards and do not keep them all in one place. The idea of carrying so many that if you’re ever pickpocketed, then you have credit cards still with you to continue your trip without a problem.
Ensure you carry cards that fit the following criteria:
- Helps you collect points/miles on international spends
- Gives you international lounge access
- Has no/low forex markup
- Has no/low ATM withdrawal fee
Also, carry cash in USD (Euros will do if you’re travelling from Europe) so that you can change it to the currency of any country you wish at a good exchange rate.
Note for Indians
We carried the following cards:
1. The BookMyForex multi-currency prepaid forex card: This was our primary card for swiping and withdrawing money in Europe, as we could fill it with Euros and several other popular currencies. It has zero forex markup and zero issuance, reload, unload, and annual fees. And you can easily reload it through the app!
2. Thomas Cook one-currency forex card: In this card you can only preload US dollars but spend in any currency with zero cross conversion charges. We got this card for spending in Latin America, as currencies of Latin American countries are not available in multi-currency cards. This looked great in theory.
But it turned out to be our biggest mistake. From card issuance to reload, the Thomas Cook card was a headache.
For the issuance, I had to visit their branch. For the reload, I had to email them instead of simply being able to do so online. Furthermore, they refused to reload the card during the trip because we were travelling for over 180 days. So we got stranded without a functioning card while we were in Latin America. DO NOT GET THIS THOMAS COOK CARD but do get a one currency forex card if travelling to not-so-popular countries.
3. Axis Magnus Credit Card: This card ended up being our saviour when Thomas Cook ditched us. We realised it has a zero ATM withdrawal fee and a reduced forex markup of 2% (as opposed to the regular 3.5%). So we used it for all our payments in Latin America, be it swiping or cash withdrawal. We also used this for accessing international lounges as well, as it offers unlimited lounge access plus 4 guest visits per year.
4. HDFC Diner’s Black Credit Card: We used this card mainly for lounge access, as it offers unlimited domestic and international lounge access for primary and add-on card members.
We carried a couple of other old forex and credit cards for emergencies but didn’t end up using them.
Currently the best travel credit card in India is Axis Atlas. It’s easy to get and has superb rewards.
Step 13: Pack for the RTW trip
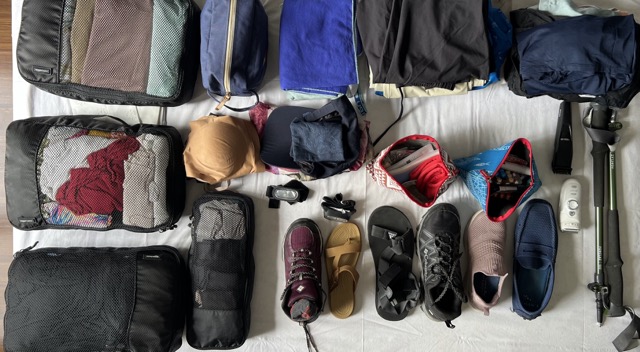
It goes without saying that you should pack light for your around-the-world trip. You will be taking a lot of flights and travelling often, so travelling with a carry-on only will be ideal for getting around without issues and not having to pay baggage fees on flights. Here are some things to keep in mind:
- Luggage dimensions, volume and weight: Before you decide the size of the bag and such, I recommend checking/noting down the luggage dimensions and weight requirement for your booked flights. Select bags accordingly.
- Carry light items that do not crush easily: Knits, polyester, viscose, and merino wool are great for such trips. Packing light items will ensure you can pack a lot of pieces of clothing and still meet weight limits.
- Pack versatile items that go well with other pieces you’re packing
- Use packing cubes to organise and compress your clothes.
To get more details on what to pack, read our detailed long-term packing list.
Step 14: Vacate the house

You’re going to be gone for a while. If you own an apartment, consider renting it out to make some passive income.
If you’re living in an apartment on rent, then it will be best to move out and get your stuff stored in a warehouse for the duration of the trip so that you’re only paying for lodging in one place. Warehouse storage is not expensive either.
We did exactly this. We used Stownest to help pack up our house and store our stuff. They were very professional and everything turned out quite well.
Step 15: Leave for your around the world trip
And it is finally time to leave for the trip. Ensure you’ve packed all your things, say goodbye to your loved ones, and set off on the journey of a lifetime. You’re probably going to have mixed feelings while leaving (like I did), but they’ll soon be replaced with pure excitement.
Here’s a short video of us leaving for our 6-month trip around the world!
Hopefully, with this post, you can plan your world trip with some clarity and in an organised way. We have more posts about planning different aspects of a world trip that’ll be helpful to you. Do read them as well and let me know if you have any questions in the comments below.
Some of the links in this blog post, ‘Planning a World Trip’, are affiliate links. We may earn a commission if you make a purchase by clicking through them. This will be at no additional cost to you. We only recommend products that we use ourselves and that might be beneficial for you.